
Making vanilla bean ice cream is about pulling out the ice bath and keeping an eye on that custard while it thickens. No fancy gadgets—just a sturdy whisk and a bowl in the fridge to chill beforehand.
You’ll spend a good chunk of time scraping seeds and simmering milk, then racing to cool that mixture down before it turns into a freezer brick. It’s messier than it sounds, but the small stuff makes a big difference in flavor.
The gentle scrape of the vanilla bean pod as I split it open, releasing that sweet, floral aroma into the air, filling the kitchen with a warm, inviting scent.
What goes into this dish
- Heavy cream: I love the richness it brings, but if you want a lighter version, swap in half-and-half. Just remember, lighter cream makes it less velvety, though. The fat content is what gives that luxurious melt-in-your-mouth feel.
- Whole milk: I use fresh whole milk for that clean, sweet milkiness. If you’re out, 2% works fine—just don’t skip this step or the custard won’t thicken properly. Keep an eye out for that gentle simmer, it’s where the magic starts.
- Granulated sugar: I usually eyeball the sweetness, but a little less keeps the vanilla spotlight bright. If you’re avoiding sugar, try honey or maple syrup, but cut back a bit to prevent over-sweetening. The sugar dissolves with a faint crackle—watch that watch.
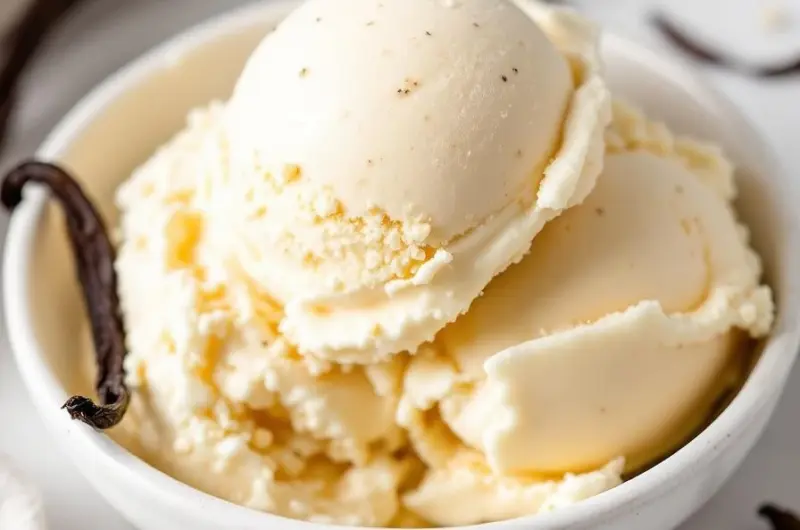
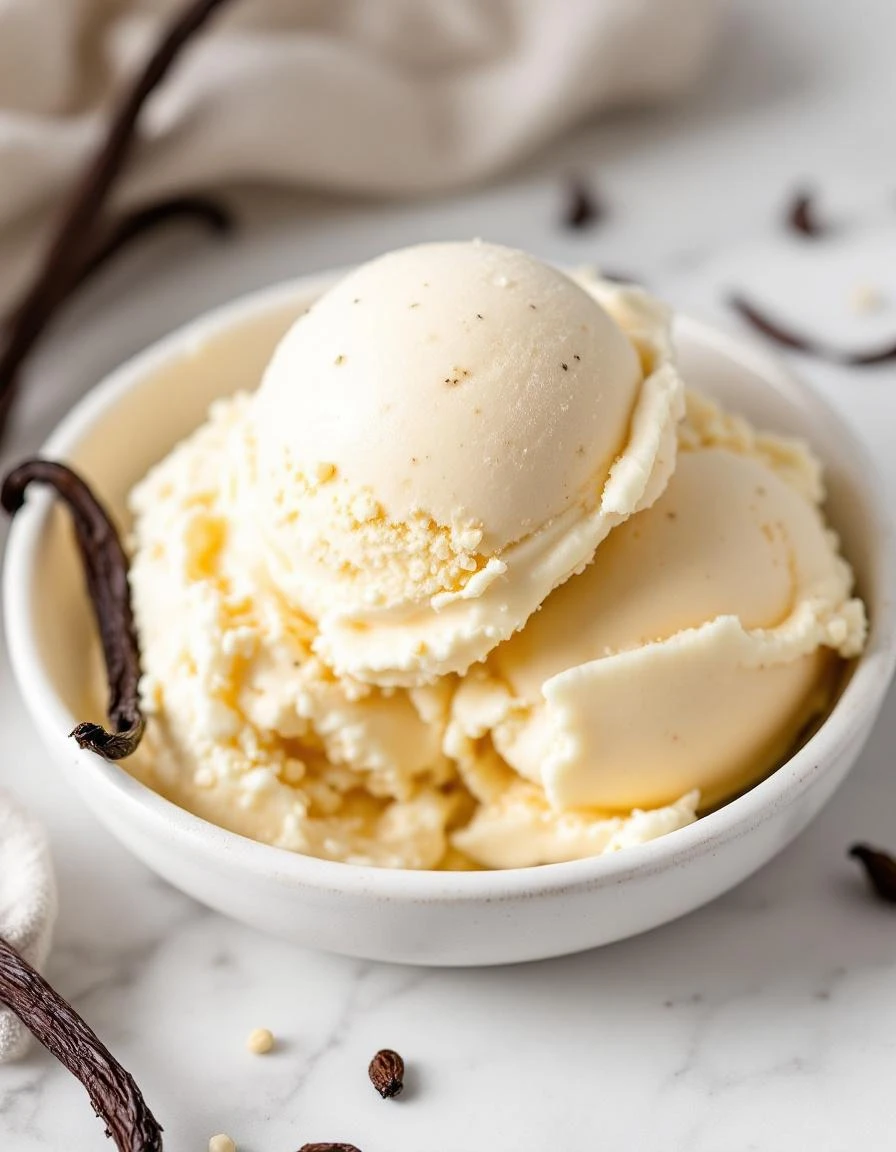
- Vanilla bean: Nothing beats fresh vanilla seeds for that aromatic punch, but vanilla extract is a quick fix. Use good-quality extract—cheaper brands can taste burnt or dull. The seeds are the little black specks that turn your ice cream into a visual treat and smell like a bakery.
- Egg yolks: I prefer farm-fresh yolks for richness, but pasteurized yolks work if raw eggs worry you. Whisk them well to avoid curdling and create that silky custard base. The yolks give the ice cream its custardy, smooth texture.
- Salt: Just a pinch awakens all the flavors, especially the vanilla. If you’re avoiding salt, skip it, but a tiny bit balances the sweetness and enhances the overall flavor profile. It’s like seasoning your dessert with a whisper of depth.
- Optional add-ins: I sometimes stir in a handful of chopped toasted nuts or a swirl of caramel—just make sure to fold them in after churning. They add texture and contrast, but keep the mix-ins small so they don’t turn into ice chunks in the freezer.
Vanilla Bean Ice Cream
Ingredients
Equipment
Method
- Split the vanilla bean lengthwise and scrape out the tiny black seeds with the back of a knife. Combine the seeds and pod with the milk and cream in a saucepan. Bring to a gentle simmer over medium heat, just until bubbles appear around the edges, filling your kitchen with that sweet vanilla aroma.
- While the custard heats, whisk together the egg yolks, sugar, and a pinch of salt in a bowl until well combined and slightly pale. This creates a smooth, creamy base for the custard.
- Slowly pour a ladle of the hot milk mixture into the egg yolks, whisking constantly to temper the eggs and prevent curdling. Repeat this process until you've incorporated about half of the hot liquid.
- Pour the tempered egg mixture back into the saucepan with the remaining milk and cream. Cook over low heat, stirring constantly with a whisk, until the custard thickens enough to coat the back of a spoon. This should take about 8-10 minutes and the mixture will be slightly steaming but not boiling.
- Pour the custard through a fine-mesh sieve into a clean bowl to remove the vanilla pod and any cooked egg bits. Place the bowl in an ice bath and stir occasionally to cool the custard quickly, helping it set and preventing overcooking.
- Once the custard is thoroughly chilled, give it a good stir and then transfer to your freezer-safe container. Cover tightly and freeze for at least 4 hours, stirring every 30 minutes during the first 2 hours to break up ice crystals and develop a smooth texture.
- After the ice cream has frozen to a soft but scoopable consistency, let it sit at room temperature for 5-10 minutes before serving. The vanilla aroma will intensify, and it will be perfectly creamy and speckled with vanilla seeds.
Common mistakes and how to fix them
- FORGOT to chill the custard before freezing? FIX by refrigerating at least 4 hours, preferably overnight.
- DUMPED the custard in the freezer without stirring? FIX by stirring every 30 minutes until firm.
- OVER-TORCHED the mixture during simmering? FIX by lowering heat and watching closely to avoid curdling.
- SKIPPED the vanilla bean seeds? FIX by adding extra seeds or a splash of vanilla extract for flavor boost.
Make-Ahead and Storage Tips
- Prepare the custard base a day ahead; chill it thoroughly in the fridge for at least 4 hours or overnight. Flavors meld better overnight.
- Freeze the churned ice cream in an airtight container for 4-6 hours before serving. For softer texture, pull out 10 minutes early to scoop easily.
- Flavor intensifies over time, so if it tastes a bit muted after freezing, let it sit at room temperature for a few minutes before scooping.
- Reheating isn’t needed, but if ice crystals form, leave the container at room temp for a few minutes or give it a quick stir with a spoon for better texture.
FAQs
1. Can I substitute vanilla extract?
Yes, you can use vanilla extract, but the seeds from the pod give a richer, more floral aroma and visible specks that make it look special. The smell of fresh seeds is bright and inviting, like walking into a bakery.
2. How much vanilla is enough?
Yes, but be cautious. Using too much can overpower the delicate vanilla flavor and make the ice cream taste chemically. Start small, and adjust based on your nose’s reaction—smell that creamy, floral scent as it chills.
3. How long can I keep it?
Ice cream is best enjoyed within a week for peak freshness. When stored properly in a sealed container, it stays creamy and flavorful, with that faint vanilla aroma lingering. After a few days, it might get a bit icy or lose some of its shine.
4. How do I soften it?
If it’s too hard straight from the freezer, let it sit at room temperature for 5-10 minutes. You’ll notice the surface soften, the aroma will bloom, and you can scoop it smoothly with that satisfying crackle of cold cream giving way.
5. Can I reheat or soften it?
Yes, gently. Warm the container in a sink of warm water for a few seconds—just enough to see the edges soften. The smell of vanilla will intensify, and the texture will turn silky and ready for a spoonful.

I’m Emily Richardson, the heart and soul behind Playing with Flavors. Cooking isn’t just a hobby for me – it’s a passion that I’ve cultivated for years, and it’s become the driving force of my life.
From the kitchen of my cozy café to the pages of this blog, every dish I create is a reflection of my love for food and the joy it brings to people.


